How to Add Wire Transfer Payment Method in Google AdSense?

How to Add Wire Transfer Payment Method in Google AdSense?

Setting Threshold and Payout Schedule

General AdSense payment threshold is $100 and Google will send the payment by 21st to 26th of every month. Though you can’t change the payment schedule, you should be able to set threshold higher than $100 and schedule your payment in future date not later than one year. You can change these settings under

 “Payments > Settings” section in your AdSense account.
Changing AdSense Payment Threshold and Schedule

How to Add Wire Transfer Payment Method in Google AdSense?

Once your threshold is reached, you will see an warning message indicating your payment is on hold and you should update the payment method. Navigate to payments settings page and click on the “Add Payment Method” link under “How you get paid” box.
Add Payment Method in Google AdSense
You should enter the following details to link the bank account to your AdSense account.
  • Name on bank account – enter your name as per the bank record.
  • Bank name – enter the full name of your bank.
  • IFSC code – this is for Indian publishers to enter Indian Financial System Code.
  • SWIFT BIC – this is a 8 or 11 digits business identifier code for transferring money (SWIFT stands for Society for Worldwide Interbank Financial Telecommunication).
  • Enter account number and re-type it again.
Filling Payment Method Form
1. You may be seeing different information on the form based on your country. Ensure to fill the correct details. If you are in doubt, get in touch with your bank to get the details.

2. You can provide any SWIFT BIC code of your bank account which handles money transfer.
Only the above mentioned information is sufficient to get your payment. Click on the “Save” button to save all the entered details. Remember the entered details can be neither viewed nor modified once saved. So enter the correct details and take the screenshot of the form if required.

Make the Payment Method Primary

You can add multiple payment methods in Google AdSense account. All the added accounts will be shown under “Payment Methods” section. Ensure to choose at least one account as “Primary” account for receiving that month payment.
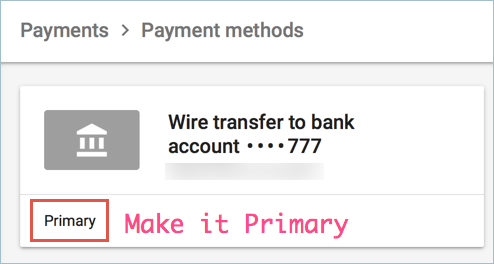
Make the Payment Method as Primary
The payment method can be changed before 20th of the month to be effective for that month payment.

Confirmation Over Email

Google will send you a confirmation email like below once the primary payment method is successfully added in your AdSense account.
Receive Confirmation Email from Google

How To Change Google Assistant To A Male Voice


To make it happen, press down the home button on your phone to launch Google Assistant, then press that blue icon on the top right side of the page. From there, go to the Settings menu, then preferences, then Assistant Voice.
On Google Home you'll need to go into the app, select More settings from the hamburger menu, and then Preferences followed by Assistant Voice.
The male voice is labelled as "Voice 2" while the female option is "Voice 1".
That's it. It's super easy to change (and super easy to change back) if you want to try something new.

Send an email step-by-step instructions | How To Send An Email

Follow these step-by-step instructions to send an email
Step 1: Log in to your Gmail account so that you are on the dashboard (main page) of your mail account.
Step 2: Click Compose.
Step 3: A new blank email window will open up. In the ‘To’ box, type in the email address of the recipient.for Example - example@gmail.com
Step 4: You might want to include someone else in your email to ‘keep them in the loop’. You can do this by clicking Cc or Bcc, which will open another field. ‘Cc’ means ‘carbon copy’ and ‘Bcc’ means ‘blind carbon copy’. Adding an email address to the ‘Cc’ field means that that person will receive a copy of the email and all the other recipients will see their email address. If an email address is put into the 'Bcc’ field, the person will get a copy of the email but no other recipient will see that address.
If you are sending the same email to lots of different people, it’s a good idea to put all the email addresses in the ‘Bcc’ field to keep your ‘mailing list’ confidential. That way, there’s no chance that it could fall into the hands of a spammer or hacker.
  

Step 5: The subject field allows you to give the recipient an idea of the topic of your email, like a heading. You don’t have to put anything in the subject box, but it can help when viewing and sorting email.
Step 6: Email text can be formatted in a similar way to text in a word document. You can change the font style, colour and size using the formatting icons. You can also create bullet points and check the spelling of your email. Choose your formatting from the menu shown.
 
Step 7: Type your message in the main body field of your email.
You can format your email using the options that are available on the toolbar. To add a link in the body of your email click on the insert link icon, then add the 'Text to display' and then a web or email address, finally click OK.
Step 8: When you’re happy with your email, click the blue Send button at the bottom of the compose window.
Step 9: The email you’ve sent will now be stored in the ‘Sent Mail’ folder on your Gmail dashboard. You may have to run your mouse pointer over the Inbox folder link to see the other folders.

Step 10: You may start an email but then decide to come back to it later rather then sending it straightaway. Gmail saves your drafts automatically. So you can simply close the email and the unfinished email will be saved to your ‘Drafts’ folder.  When you decide that you’re ready to send it, you can retrieve it from the ‘Drafts’ folder by clicking Drafts and then clicking the correct item in the ‘Drafts’ folder list. Finish the email and click Send as normal.